Proper roof ventilation is essential for maintaining comfortable temperatures inside your home and preventing moisture buildup in the attic. One of the most effective ways to enhance airflow is by installing a whirlybird, or turbine vent, especially on a Colorbond roof. A whirlybird is a rotating vent that uses wind power to draw hot air out of your roof cavity. Installing it on a Colorbond metal roof might seem like a challenging task, but with the right approach, tools, and safety measures, it can be a successful DIY project or a job for a professional. This guide offers a comprehensive step-by-step method on how to install a whirlybird on a Colorbond roof safely and efficiently.
Understanding Whirlybirds and Colorbond Roofs
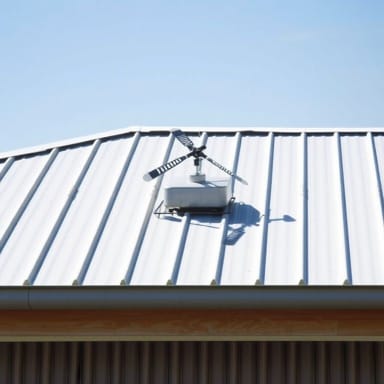
What is a Whirlybird?
A whirlybird is a wind-driven turbine ventilator that spins to create an upward airflow. It helps in removing hot and stale air from the roof cavity and improves ventilation throughout the home. Whirlybirds require no electricity and work continuously as long as there is a breeze.
Why Choose a Colorbond Roof?
Colorbond roofs are made from pre-painted steel that’s known for durability, resistance to weather, and aesthetic appeal. While strong and low-maintenance, they can trap heat inside if ventilation is poor. That’s where installing a whirlybird can make a big difference in overall comfort and energy efficiency.
Preparation Before Installation
Gather the Necessary Tools and Materials
- Whirlybird kit with base flashing and turbine head
- Drill and metal-cutting hole saw
- Measuring tape
- Marker or pencil
- Silicone roofing sealant
- Roof screws (self-drilling)
- Safety harness and ladder
- Protective gloves and goggles
Select the Right Location
Identify the part of the roof where hot air is most likely to accumulate typically near the highest point of the roof cavity. Avoid positioning the whirlybird near valleys or roof ridges where water might pool. For larger homes or multi-story buildings, consider installing more than one whirlybird for optimal air circulation.
Step-by-Step Installation Guide
Step 1: Safety First
Before climbing on the roof, ensure that your ladder is stable and that you’re wearing a harness if working on a steep pitch. Wait for calm weather to avoid wind hazards during installation.
Step 2: Mark the Installation Point
From inside the roof cavity, locate a clear area with no rafters or wiring and mark the spot. Then, transfer the mark to the outside of the Colorbond roof using a measuring tape and pencil. This is where the hole for the vent will be cut.
Step 3: Drill the Vent Hole
Use a metal-cutting hole saw to carefully cut a circular hole in the Colorbond sheet. The hole should be the same diameter as the base of the whirlybird flashing. Smooth out the edges using a metal file to prevent sharp burrs.
Step 4: Install the Flashing Base
Position the flashing base into the hole and shape it to fit the contours of the Colorbond roof profile. Apply silicone roofing sealant along the edges of the flashing and underneath to create a watertight seal. Secure the base using self-drilling screws, ensuring it sits flat and does not allow water ingress.
Step 5: Attach the Whirlybird Head
Fix the rotating head of the whirlybird onto the base. Most whirlybirds come with adjustable necks, allowing you to set the right angle according to your roof’s pitch. Use screws or clamps provided in the kit to secure it tightly. Ensure the turbine spins freely and is not obstructed.
Step 6: Seal and Inspect
Once the turbine is attached, apply additional silicone around any exposed screw heads and seams to prevent leaks. After installation, inspect the surrounding roof sheets to ensure they remain undamaged and intact. Test the spinning mechanism by rotating it gently with your hand.
Tips for a Successful Installation
- Choose a cool morning or late afternoon to work on the roof, as Colorbond sheets can become extremely hot under the sun.
- If you’re unsure about cutting through the roof, seek assistance from a licensed roofer to avoid damage.
- Regularly check your whirlybird after installation to ensure it remains clean, rust-free, and functioning properly.
- Combine whirlybirds with ceiling insulation for the best indoor temperature control.
Benefits of Installing a Whirlybird on a Colorbond Roof
Improved Ventilation
Whirlybirds promote air circulation, which helps remove heat and moisture from the roof cavity. This results in a cooler home during hot months and helps prevent mold and mildew formation.
Energy Efficiency
By allowing hot air to escape, your air conditioning system doesn’t have to work as hard. This can lead to noticeable savings on electricity bills, especially during summer.
Long-Term Roof Protection
Moisture buildup can lead to corrosion or damage to roof structures. Whirlybirds help preserve the condition of both the Colorbond sheets and the timber structure beneath by preventing condensation.
Low Maintenance
Once installed, a whirlybird operates without any power or ongoing maintenance. Occasionally checking for debris or wear is generally sufficient to keep it functioning well for years.
When to Seek Professional Help
If your Colorbond roof is high-pitched, multi-tiered, or has complex guttering systems, it might be safer and more efficient to hire a professional installer. Also, if your roof is already showing signs of leakage or structural wear, have it inspected before cutting into it.
Installing a whirlybird on a Colorbond roof is a smart way to enhance your home’s ventilation and improve indoor comfort. While the installation process involves careful planning and the use of proper tools, it is a manageable task for many homeowners with basic DIY skills. By following the correct steps, sealing all components properly, and taking necessary safety precautions, you can enjoy the long-term benefits of a cooler, healthier, and more energy-efficient living environment. Whether you decide to install it yourself or hire a professional, a well-placed whirlybird is a valuable upgrade to any Colorbond-roofed home.